

Robotics is been fun and playful for kids and even for youngsters. But, it’s been a challenging scenario for engineers and researchers to build an advanced electro-mechanical machines. Science and engineering plays a greater role to develop a new technology for building advanced robots. Science and mathematics lies behind from a tiny little walking robot (which is called as ‘toys’ for normal humans) to a bigger size humanoid robot. Everyone admires and appreciates the product and the creator, but not the science and maths behind it.
")
It’s not about equations and coding. It’s about curiosity and interest. So, here is your place to learn robotics in advancements with fun and maths!
> Let’s smash up things and play with robots…………!

Basic things you will need:
> Scissors, Cello tapes, Double side tapes, a few pieces of card boards, screw driver, wire cutter, soldering iron, PC/Laptop with Arduino IDE software for programming.
Range finding Autonomous cat
A wheeled robot which can avoid the obstacles in its visibility by finding and comparing range of the object in its view by mimicking the function of cute kitty. It’s autonomous in function. This robot is a basic start to autonomous robotics.Time Duration:
>Expert’s: 40 minutes
>Starter’s: 180 minutes

>Ultrasonic sensor
>Arduino based microcontroller- Arduino Uno
>Single strand wires / Jumper wires
>Servo motor
>Bread board
>L293D driver IC
>2 set of Wheels
>1 set Dc motors (500rpm)
>Dummy axles
>Chassis
>12V Battery
| You can get these components from a local electronic stores market or from online stores such as www.ebay.in / www.ebay.com or you can refer to your advisor. |
Sensor overview:
Ultrasonic sensor / Ping sensor:
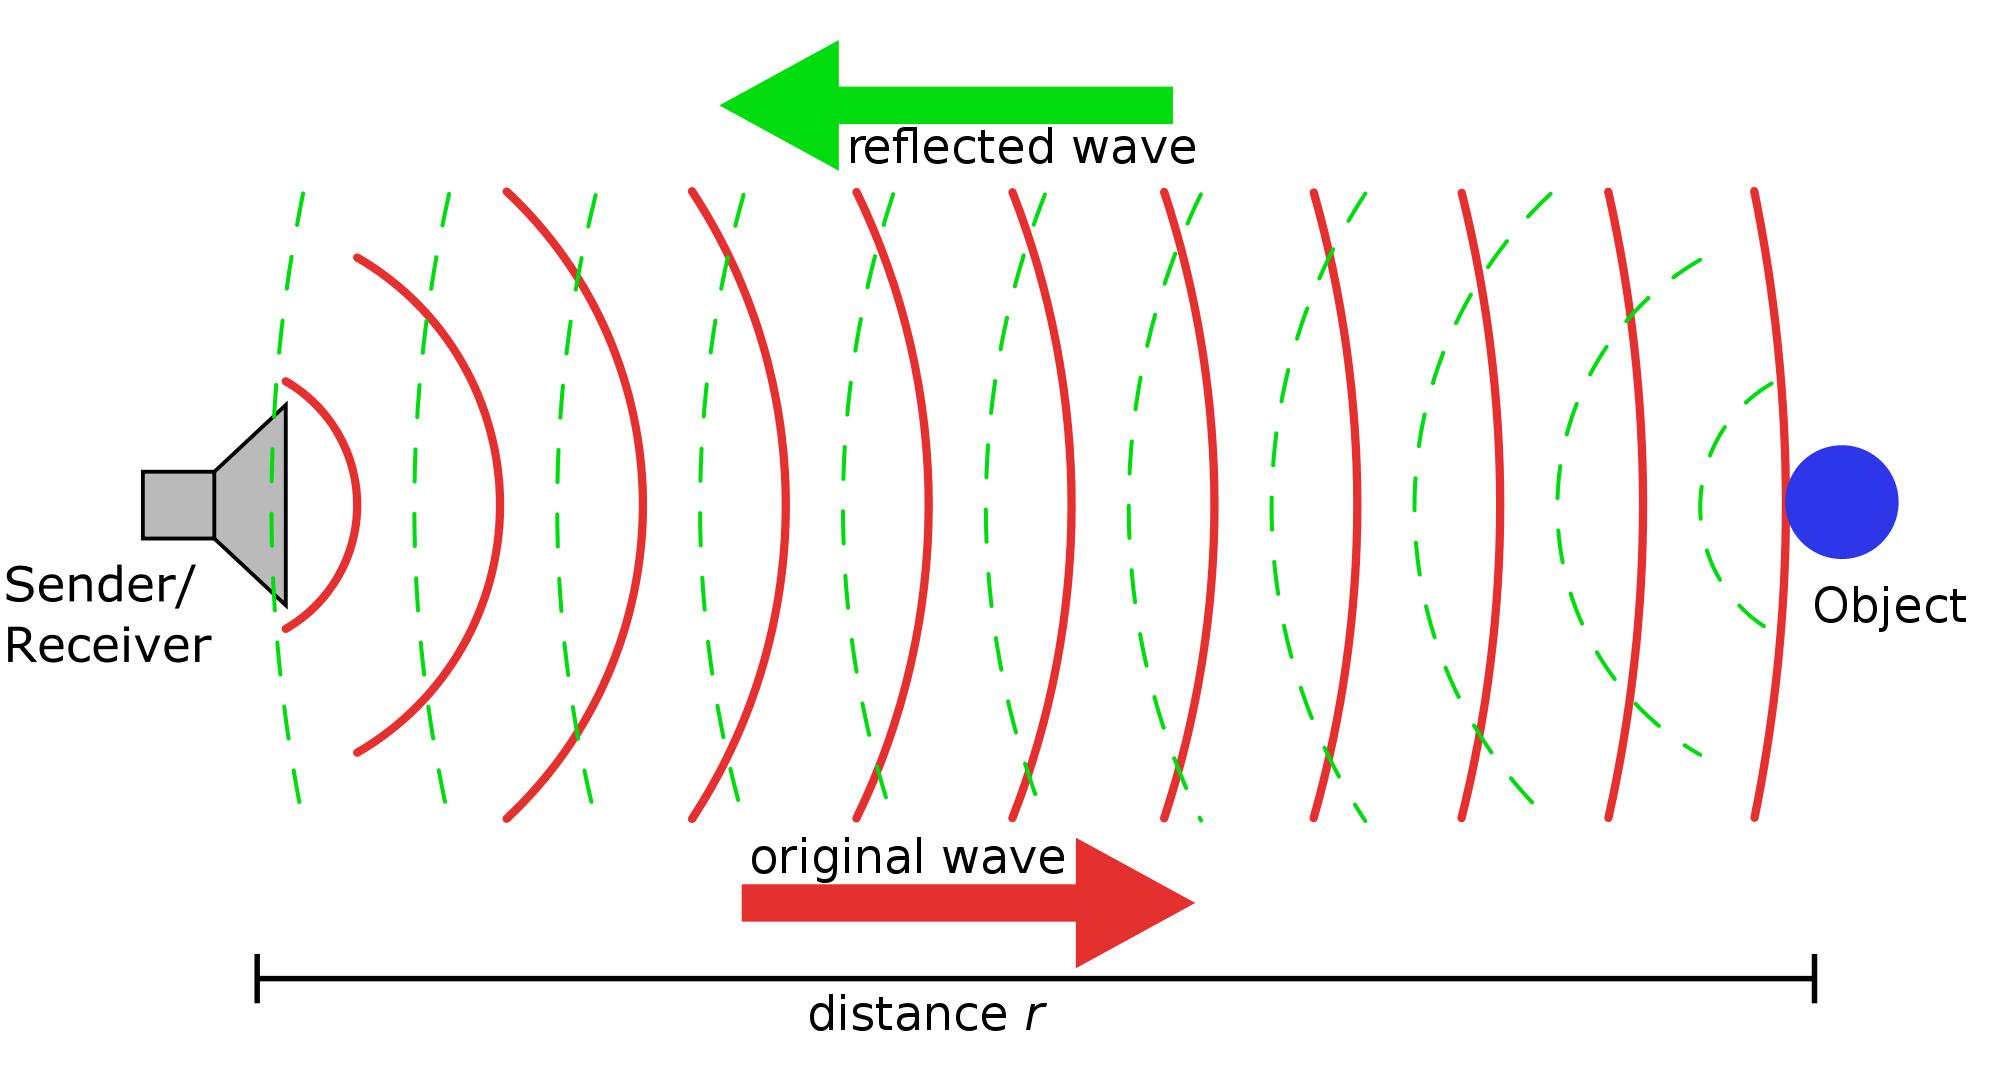
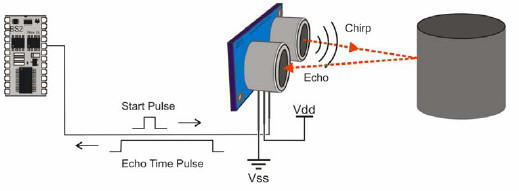
Ultrasonic sensor is simply a transducers which evaluate the attributes of the target by interpreting the echoes from radio or sound waves. It functions by measuring the time interval between sending the signal and receiving the echo to determine the distance to an object.
Working of an ultrasonic sensor:

>Vcc, Gnd, Trigger, Echo
OR
>Vcc, Gnd, SIG
>The trigger and echo pins are connected in a single pin ‘SIG’
Servo motor:
>Servo motors has three simple parts: a DC motor, potentiometer and a control circuit. The motor is attached by gears to the control wheel. As the motor rotates, the potentiometer's resistance changes, so the control circuit can precisely regulate how much movement there is and in which direction.
When the shaft of the motor is at the desired position, power supplied to the motor is stopped. If not, the motor is turned in the appropriate direction. The desired position is sent via electrical pulses through the signal wire. The motor's speed is proportional to the difference between its actual position and desired position. So if the motor is near the desired position, it will turn slowly, otherwise it will turn fast. This is called proportional control.
Servos are controlled by sending an electrical pulse of variable width, or pulse width modulation (PWM), through the control wire. There is a minimum pulse, a maximum pulse, and a repetition rate. A servo motor can usually only turn 90 degrees in either direction for a total of 180 degree movement. The motor's neutral position is defined as the position where the servo has the same amount of potential rotation in the both the clockwise or counter-clockwise direction. The PWM sent to the motor determines position of the shaft, and based on the duration of the pulse sent via the control wire; the rotor will turn to the desired position. The servo motor expects to see a pulse every 20 milliseconds and the length of the pulse will determine how far the motor turns.
Working of a servo motor:

Servo motor connections:


L293D IC:
L293D is a motor driver IC which has the H-Bridge circuit inbuilt within it. It can control two motors by enabling the corresponding input and output pins of the IC.
 |
Pin configuration:
| Enable and input pins should be supplied with 5V from the Arduino board. Vs, Vss should be powered separately from external battery. Make sure to place the IC in a correct direction by identifying the notch. |
Let’s understand and have fun with components used>
Programming the Arduino:
<Programming is just a way to speak/communicate with the components>
Download the Arduino IDE software from the link below, www.arduino.cc/en/Main/Software
Install suitable drivers to your PC/Laptop for uploading the codes into the Arduino Uno.
<Open the New sketch and use the code below to understand the working of thr components use to build the cat robot>
Let’s do programming >

At first let us work on ultrasonic sensor>
Step 1:
Connect the Arduino Uno to the PC which has Arduino IDE software. Type the codes below, which is used to find the distance of the obstacle using the ultrasonic sensor.
Wire the sensor:
Connect the ‘trigger pin’ to ‘pin 12’ of Arduino Uno and ‘Echo pin’ to ‘pin 11’ of Arduino Uno.
Connect the ‘Vcc pin’ and ‘Gnd pin’ to ‘5V pin’ and ‘Gnd Pin’ of Arduino Uno.

coding:
#include#define TRIGGER_PIN 12 // Arduino pin tied to trigger pin on the ultrasonic sensor. #define ECHO_PIN 11 // Arduino pin tied to echo pin on the ultrasonic sensor. #define MAX_DISTANCE 200 // Maximum distance we want to ping for (in centimeters). Maximum sensor distance is rated at 400-500cm. NewPing sonar(TRIGGER_PIN, ECHO_PIN, MAX_DISTANCE); // NewPing setup of pins and maximum distance. void setup() { Serial.begin(9600); // Open serial monitor at 9600 baud to see ping results. } void loop() { delay(50); // Wait 50ms between pings (about 20 pings/sec). 29ms should be the shortest delay between pings. unsigned int uS = sonar.ping(); // Send ping, get ping time in microseconds (uS). Serial.print("Ping: "); Serial.print(uS / US_ROUNDTRIP_CM); // Convert ping time to distance in cm and print result (0 = outside set distance range) Serial.println("cm"); }
Output:
Ø Use the serial monitor to see the output from Arduino Uno.
Ø The above code is used to test the ultrasonic sensor by giving the distance of the objects as output in the serial monitor of Arduino IDE. Try focusing the ultrasonic sensor to various objects at various distances.

We are now able to see the working of ultrasonic sensor in action.
Let’s Centre the servo:
Step 2:
Take the servo and connect the wires of the servos to the Arduino as said below:
Identify the Vcc, Gnd, Signal wires of the servo motor correctly >
· Vcc pin of servo to 5V pin on Arduino
· Gnd pin of servo to Gnd pin on Arduino
· Signal pin of Servo to pin 9 on Arduino
#includeUse the code below to centre the servo at 90 degree position in case of 0 to 180 degree servo.Servo servo; void setup() { servo.attach(9); } void loop() { servo.write(90); }

Output:
Ø You will find that your servo has turned to 90 degree/centred.
Thus the servo has been centred >
Let’s see how L293D works>
Ø Fix the L293D IC on the breadboard and wire all the pins of the IC accordingly as shown in the pin configuration below:
· motor1 Pin1 = 3 on Arduino // pin 2 on L293D IC
· motor1 Pin2 = 4 on Arduino // pin 7 on L293D IC
· enable1 Pin = 5 on Arduino // pin 1 on L293D IC
· motor2 Pin1 = 8 on Arduino // pin 10 on L293D IC
· motor2 Pin2 = 9 on Arduino // pin 15 on L293D IC
· enable2 Pin = 10 on Arduino // pin 9 on L293D IC
>Connect the output 1, 2 and output 3, 4 to the motor 1 and motor 2 respectively.
>Connect the VCC and V+ to a external battery of 6V to 12V. This will act as a power supply to the motors.
Schematic circuit:

Coding:
int motor1Pin1 = 3; // pin 2 on L293D IC
int motor1Pin2 = 4; // pin 7 on L293D IC
int enable1Pin = 5; // pin 1 on L293D IC
int motor2Pin1 = 8; // pin 10 on L293D IC
int motor2Pin2 = 9; // pin 15 on L293D IC
int enable2Pin = 10; // pin 9 on L293D IC
int state;

void setup() {
    // sets the pins as outputs:
    pinMode(motor1Pin1, OUTPUT);
    pinMode(motor1Pin2, OUTPUT);
   pinMode(enable1Pin, OUTPUT);
    pinMode(motor2Pin1, OUTPUT);
    pinMode(motor2Pin2, OUTPUT);
    pinMode(enable2Pin, OUTPUT);
    // sets enable1Pin and enable2Pin high so that motor can turn on:
    digitalWrite(enable1Pin, HIGH);
    digitalWrite(enable2Pin, HIGH);
    // initialize serial communication at 9600 bits per second:
    Serial.begin(9600);
}

void loop() {
    //if some date is sent, reads it and saves in state
    if(Serial.available() > 0){
      state = Serial.read();
    }
    // if the state is '1' the DC motor will go forward
    if (state == '1') {
        digitalWrite(motor1Pin1, HIGH);
        digitalWrite(motor1Pin2, LOW);
        digitalWrite(motor2Pin1, LOW);
        digitalWrite(motor2Pin2, HIGH);
        }


    // if the state is '2' the motor will turn left
    else if (state == '2') {

        digitalWrite(motor1Pin1, HIGH);
        digitalWrite(motor1Pin2, LOW);
        digitalWrite(motor2Pin1, HIGH);
        digitalWrite(motor2Pin2, LOW);
    }
    // if the state is '3' the motor will Stop
    else if (state == '3' ){
        digitalWrite(motor1Pin1, LOW);
        digitalWrite(motor1Pin2, LOW);
        digitalWrite(motor2Pin1, LOW);
        digitalWrite(motor2Pin2, LOW);
        }
    // if the state is '4' the motor will turn right
    else if (state == '4') {
        digitalWrite(motor1Pin1, LOW);
        digitalWrite(motor1Pin2, HIGH);
        digitalWrite(motor2Pin1, LOW);
        digitalWrite(motor2Pin2, HIGH);
    }
    // if the state is '5' the motor will Reverse
    else if (state == '5') {
        digitalWrite(motor1Pin1, LOW);
        digitalWrite(motor1Pin2, HIGH);
        digitalWrite(motor2Pin1, HIGH);
        digitalWrite(motor2Pin2, LOW);
    }
}
Ø Upload the codes into the Arduino and open the serial monitor and type 1 or 2 or 3 or 4 or 5 for respective actions to take place. You should have the data cable connected to the Arduino Uno. Ø Thus the motor direction is controlled using a serial interface between the Arduino and PC with the help of L293D motor driver.
Let’s jump into action:
>Attach the Dc motors and dummy axles to the chassis and connect the wheels to it. Make sure to fix the wheels tight enough to the axles.


>Then place a cardboard piece above the chassis (if the chassis is made of metal) to mount the micro-controller board and the bread board on the chassis.
>This is done, so as to reduce any electrical conductivity between the metal chassis and the micro-controller board.
>Mount the servo motor on the front end of the chassis and attach the ultrasonic sensor over its head by using a double side tape.
>Use L-clamps to support the servo motor firmly to the chassis of the robot.
>Follow the steps below for connecting the micro-controller (Arduino Uno) to the ultrasonic sensor, L293D driver and the servo motor.
Circuit diagram:

Connections overview>
Servo motor- signal wire to pin 11 on Arduino Uno
Ultrasonic sensor- Echo pin to pin 6 on Arduino Uno
Ultrasonic sensor- Trigger pin to pin 7 on Arduino Uno
L293D IC- Input 1, 2 (motor 1) to pin 3, 4 on Arduino Uno
Input 3, 4 (motor 2) to pin 8, 9 on Arduino Uno
Enable 1 (motor 1) to pin 5 on Arduino Uno
Enable 2 (motor 2) to pin 10 on Arduino Uno

Programming the Arduino for Autonomous cat robot:
The program is simple and involves the combinations of above implied programs for ultrasonic sensor, servo motor and L293D motor driver.
Function of the program:
>The ultrasonic sensor is swept 30 degree towards left and right from servos centre position.
>This determines the range of object on the left and right of the robot’s front end.
>The distance is compared and the robot is moved along the direction which has obstacle at a longer distance. This is looped again and again and the robot moves in a confined space by avoiding the obstacles in its way autonomously
Coding: #include >Change the connections of respective “input pins” accordingly to rotate the motor in particular direction specified by the program >You can modify the angle given to sweep the sensor according to your robot size. You can modify the program according to the model of ping sensor used as 4 pins or 3pins. >Once the program is uploaded, Connect the batteries separately for Arduino and L293D driver and place the robot on the floor and see the fun and the behaviour of robot >  Check out the video below: Finally we made it. An autonomous cat that rolls on the Surface by avoiding its obstacles on its way, by using its Micro-controller as its brain! Let’s rock on to next robot > Presented by, Robotics and Artificial Intelligence Foundation-RAIF  |
No comments:
Post a Comment